Showing posts with label Solar. Show all posts

Thursday, April 3, 2025

More Projects

Monday - Another warm day today. After two days with the Multiplus powered on plus whatever other parasitic loads, the battery was down to 81% SOC (state of charge) or about 11% per day. I plugged in shore power to recharge the battery, and the temperature of the Multiplus was 111°F. Not unreasonable, but I really do need to get some sort of ventilation for the underseat compartment. I'm thinking of an air intake vent near the Multiplus and an exhaust fan next to the battery. I should have another temperature controller lying around to control the 12V fan. 

While being used as a rental, the roof vents had covers over them. They were removed, but the mounting hardware was still installed, making it simple to install new vent covers. Now, the vents can be left open even when it is raining. There is one more vent in the front, but I'm considering replacing that vent with a MaxxAir fan.

Tuesday
 - I drove the Jeep with the trailer to Uvalde to the large hardware store to pick up some half-height strut channel, aka as Unistrut. I needed to bring the trailer as each piece is 10' long.  The high strength outdoor VHB tape will be used to attach it to the roof as well as several screws into the aluminum channel roof joists. At least, I'm pretty sure that they are aluminum. The nuts with the blue plastic slide into the strut channel will be used to mount the solar panels. The slots in the channel will have Dicor self-leveling sealant to keep water from the back of the VHB tape.

The heat and humidity prevent much work from being done in the afternoon. The mornings are pleasant.

Wednesday
 - Two ten-foot sections of the strut channel are stuck to the roof after cleaning the roof and the metal strut channel with acetone. I used high-strength outdoor-rated VHB tape. I then sealed the inside of the strut channel with 1” wide strips of Eternabond tape. Then, I ran some Dicor along the sides of the channel to protect the edges of the VHB tape. I still want to run screws into the roof joists but their location is somewhat elusive. 

I started working on this at ~7:30am, and by noon, it was way too hot. I’ll start on the roof penetration for the wiring tomorrow morning. And I’m still waiting for a cooling fan. The Magnum inverter complained about temperatures as well. The transformer hit 250°F when the unit shut down. I have a fan blowing into the compartment right now. I think a cooling fan is needed to help reduce the temperature in that compartment. 

Thursday - I finally got the roof entry fitting installed. The roof looks to be only about 2" total. I'm thinking that for the unistrut along the roof edge, I may try using ¼" bolts through the roof. It'll be cooler in a couple of days. The 10AWG wire is currently run into the compartment and I did manage to find some latch duct at the local Ace Hardware to kind of protect the wire in the vertical run from the upper cabinet to the dinette bench where the rest of the electrical upgrade is located. The 12V fan and vents arrived from Amazon this evening. Tomorrow's project.

It was 94°F, and I didn't really feel like cooking anything. I decided to try out one of the Chinese buffets in Hondo. I wasn't expecting much. It really wasn't that bad. Not great, but not as bad as I was led to believe. 

Sunday, March 23, 2025

Removing the Solar Panels

Saturday - It’s another warm day today. This morning, I removed three of the four solar panels from the class A to be installed on the class C. The plastic glue-on solar panel mounts are really junk. All of them are discolored and brittle from UV and the Sikaflex doesn’t stick to them very well. The Sikaflex is well bonded to the fiberglass roof material but the fiberglass isn’t very thick. I would not recommend just gluing down the solar panels. 

I will wait for cooler weather before removing the plastic solar panel mounts and sealing up the screw holes with Eternabond and Dicor. The roof also needs a good cleaning. 

But burgers with grilled onions and tater tots sounds good today!

Sunday - I finished up the DC-DC installation today. I installed an MRBF fuse on the positive battery terminal and ran a 6 AWG cable from there to the input of the DC-DC charger. I picked up the common ground model as it was a little cheaper. Plus, I didn’t need to run a separate ground wire from the start battery. After setting it up via Bluetooth, I tried it out. It works as advertised. Up to 30amps to the SOK battery when the engine is running. 

The stock AGM battery was only 80ah and you could only use about half of that without damaging the battery internally. The SOK battery has about five times the usable capacity but the addition of the inverter adds new capability but potentially.

Sunday, November 24, 2024

Benson, AZ - TT

Saturday - A short travel day to one of our favorite RV parks in Benson, AZ. We are only here for a couple of days due to the windshield delays but I’m not going to complain. No windshield issues on the three day trip. The pool and hot tub here are fantastic. Nice and warm with everything working. This is the first place we’ve been in a long time where everything works. 

The task for today was washing the Jeep. After all the trips behind the RV and all around Texas, it was pretty filthy. This park charges a $10 fee if you want to wash your car but at least it’s an option. The soft top precludes running it through a car wash though I have used the “no touch” automatic washes without any noticeable issues. 

It really feels like a vacation right now. A few more tasks tomorrow. 

Sunday - Since the temperatures are dropping, I rewired the solar panels from one series string of four panels to two strings of two panels. As the temperature drops, the voltage of the panels increase. And there is a chance that the voltage with the four panels in series could exceed the maximum input voltage of the charge controller. Breaking up the panels into two strings of two cuts the voltage in half. The downside is that it increases the current through the long run to the charge controller which increases the resistive loss. But that’s better than damaging the controller. 

I replaced the burner in the rear furnace. That isn’t the reason why it won’t run but I noticed that it was starting to burn out when I disassembled it. At that time, I just ordered a replacement part. This time, I was able to measure 12VDC at the circuit breaker within the furnace. I will check the furnace signal connection within the rear A/C unit as that is how it communicates with the thermostat. But now, I’m sitting by the pool & hot tub. 

I did need to add another 1/2 liter of ATF fluid to the hydraulic reservoir. That’s after driving ~600+ miles. Tomorrow, we have ~300 miles and then another 120 miles to our next longer stop. 

Later - For some reason, the rear furnace now works. I messed around with the wiring but didn’t find any problem. I don’t like these kind of problems..

Thursday, March 21, 2024

More Projects - SKP

Wednesday - UPS delivered this yesterday. It is a drive-over cable protector for the propane hose. Neither the Ural nor the Jeep is that heavy but it’s rated for 11,000 lbs. The yellow part is hinged to position the hose or cords easily into the channels.

All the bits and pieces came in for me to allow the solar panels to lay down again. One of the panels has an additional piece of steel angle to reinforce the plastic mounts to the roof. And that steel angle prevents me from putting nuts on the bolt holding the panel in the lowered position. My solution is to install rivnuts on the mount to take the place of the nuts. And instead of just doing the one problem panel, I was going to do all of them. Including the panel supports. This means no wingnuts or other hardware to get lost. The picture was my test of the tool.  

I got a couple of the panels done before the afternoon test session. The rivnuts and the tool work. And the metric unibit was a good purchase as it made the perfect size hole for the M8 rivnuts.

I now have the solar panels flat on the roof again. This project is almost done.

Thursday -
The new burner head arrived today and I had it installed in about 15 minutes. The propane is back on and the thermostat switched to the furnace instead of the heat pump. We’ll see how well it works once it’s cooled back down. It’s 71°F right now.

The next project was installing rivnuts on the aluminum pieces used to hold the solar panels when tilted. These rivnuts are SS but weren’t much more difficult to install. I don’t plan to install them again while we are parked here. 

Still have more projects...

Thursday, February 1, 2024

Tilting the Solar Panels

Thursday - After figuring out how to install the Renogy tilting mounts, the last two panels went quickly. I was all done around 3pm or so and that included adding Dicor to the screw heads. I still need to do a bit more but need some more hardware from Tractor Supply to add a little more support to one of the plastic mounts. 

Today was kind of cloudy (but warm!) and you can see when I added the second two panels. I don’t remember ever getting over 500 watts from this installation. The charge controller maxes out at 50 amps which is around 600 watts. I may need to upgrade the charge controller if it maxes out...

Wednesday, November 16, 2022

Finishing Projects

Monday - Another cool night. And, I don’t think the high temperature was above 70°F. I finally got around to washing the Jeep. It was getting pretty dirty plus the tree was shedding leaves on it. I also went up on the roof of the RV and checked the solar panel. The VHB tape seems to be solid except one corner has a small gap. It seems that the roof isn’t completely flat. Tomorrow, I’ll unscrew that mount from the panel and try and replace the tape and remount the plastic bracket so there isn’t a gap by elongating the holes in the bracket. 

Tuesday - Today, I adjusted the solar panel mounting bracket that wasn’t making good contact with the roof. I also added five screws where the brackets lined up with the metal roof joists. I still need to pick up some wire clamps to prevent the wires from moving around with the wind. The Dicor self-leveling sealant is just to help protect the VHB tape. Before we leave here in January, I’ll check the panels again. If I add more panels, I think I will use aluminum unistrut instead of these plastic brackets. 

Not a “project” but dinner was kimchi fried rice. The Blackstone does a fantastic job. 

Staying up really late (for me) waiting to see if Artemis 1 launches on SLS. While I’m waiting, I decided to make another batch of furikake Chex mix. The last batch was a hit. 

Wednesday - I went to Great Clips for my quarterly haircut. I got a coupon that made it ~40%. A good enough deal. We went to Blackrock Brewers, a small microbrewery in a commercial area near here, with Lynne and Jerry. They had a blackberry sour that was pretty good. Afterwards, we went to In-N-Out for dinner. There is always a huge line at the drive-up so I was expecting it to be crowded. It wasn’t too bad inside. 

Sunday, November 13, 2022

Another Project

Thursday - My next project arrived today. Another solar panel. The older panels are 210watt, 12V panels but they are no longer made. This is a 215watt, 12V panel that I will install in series with the other three. The current rating is similar (Isc=9.85amps @22.4V vs Isc=10.83 @20.72V) or close enough. With the low sun angle, I’m not getting anywhere near 200 watts from my non-tilting panels. 

A quick test verified that the panel works. Voc=25.1V, Isc=9.85amps with the panel aimed roughly towards the sun. With it lying flat on the ground, Isc was around 6.8amps which is about what I am seeing from the other panels. The high temperature over the weekend is over 70°F so that’ll be ideal for the Sikaflex to set. Though I’m toying with using the high strength 3M tape to see how well it bonds. When I installed the other panels, there was only a few days before we would be traveling. Possibly not enough time for the tape to bond.

I’m still thrilled with the performance of the JC Refrigeration unit. An improvement would be two compressors so the freezer could have its own controller. 

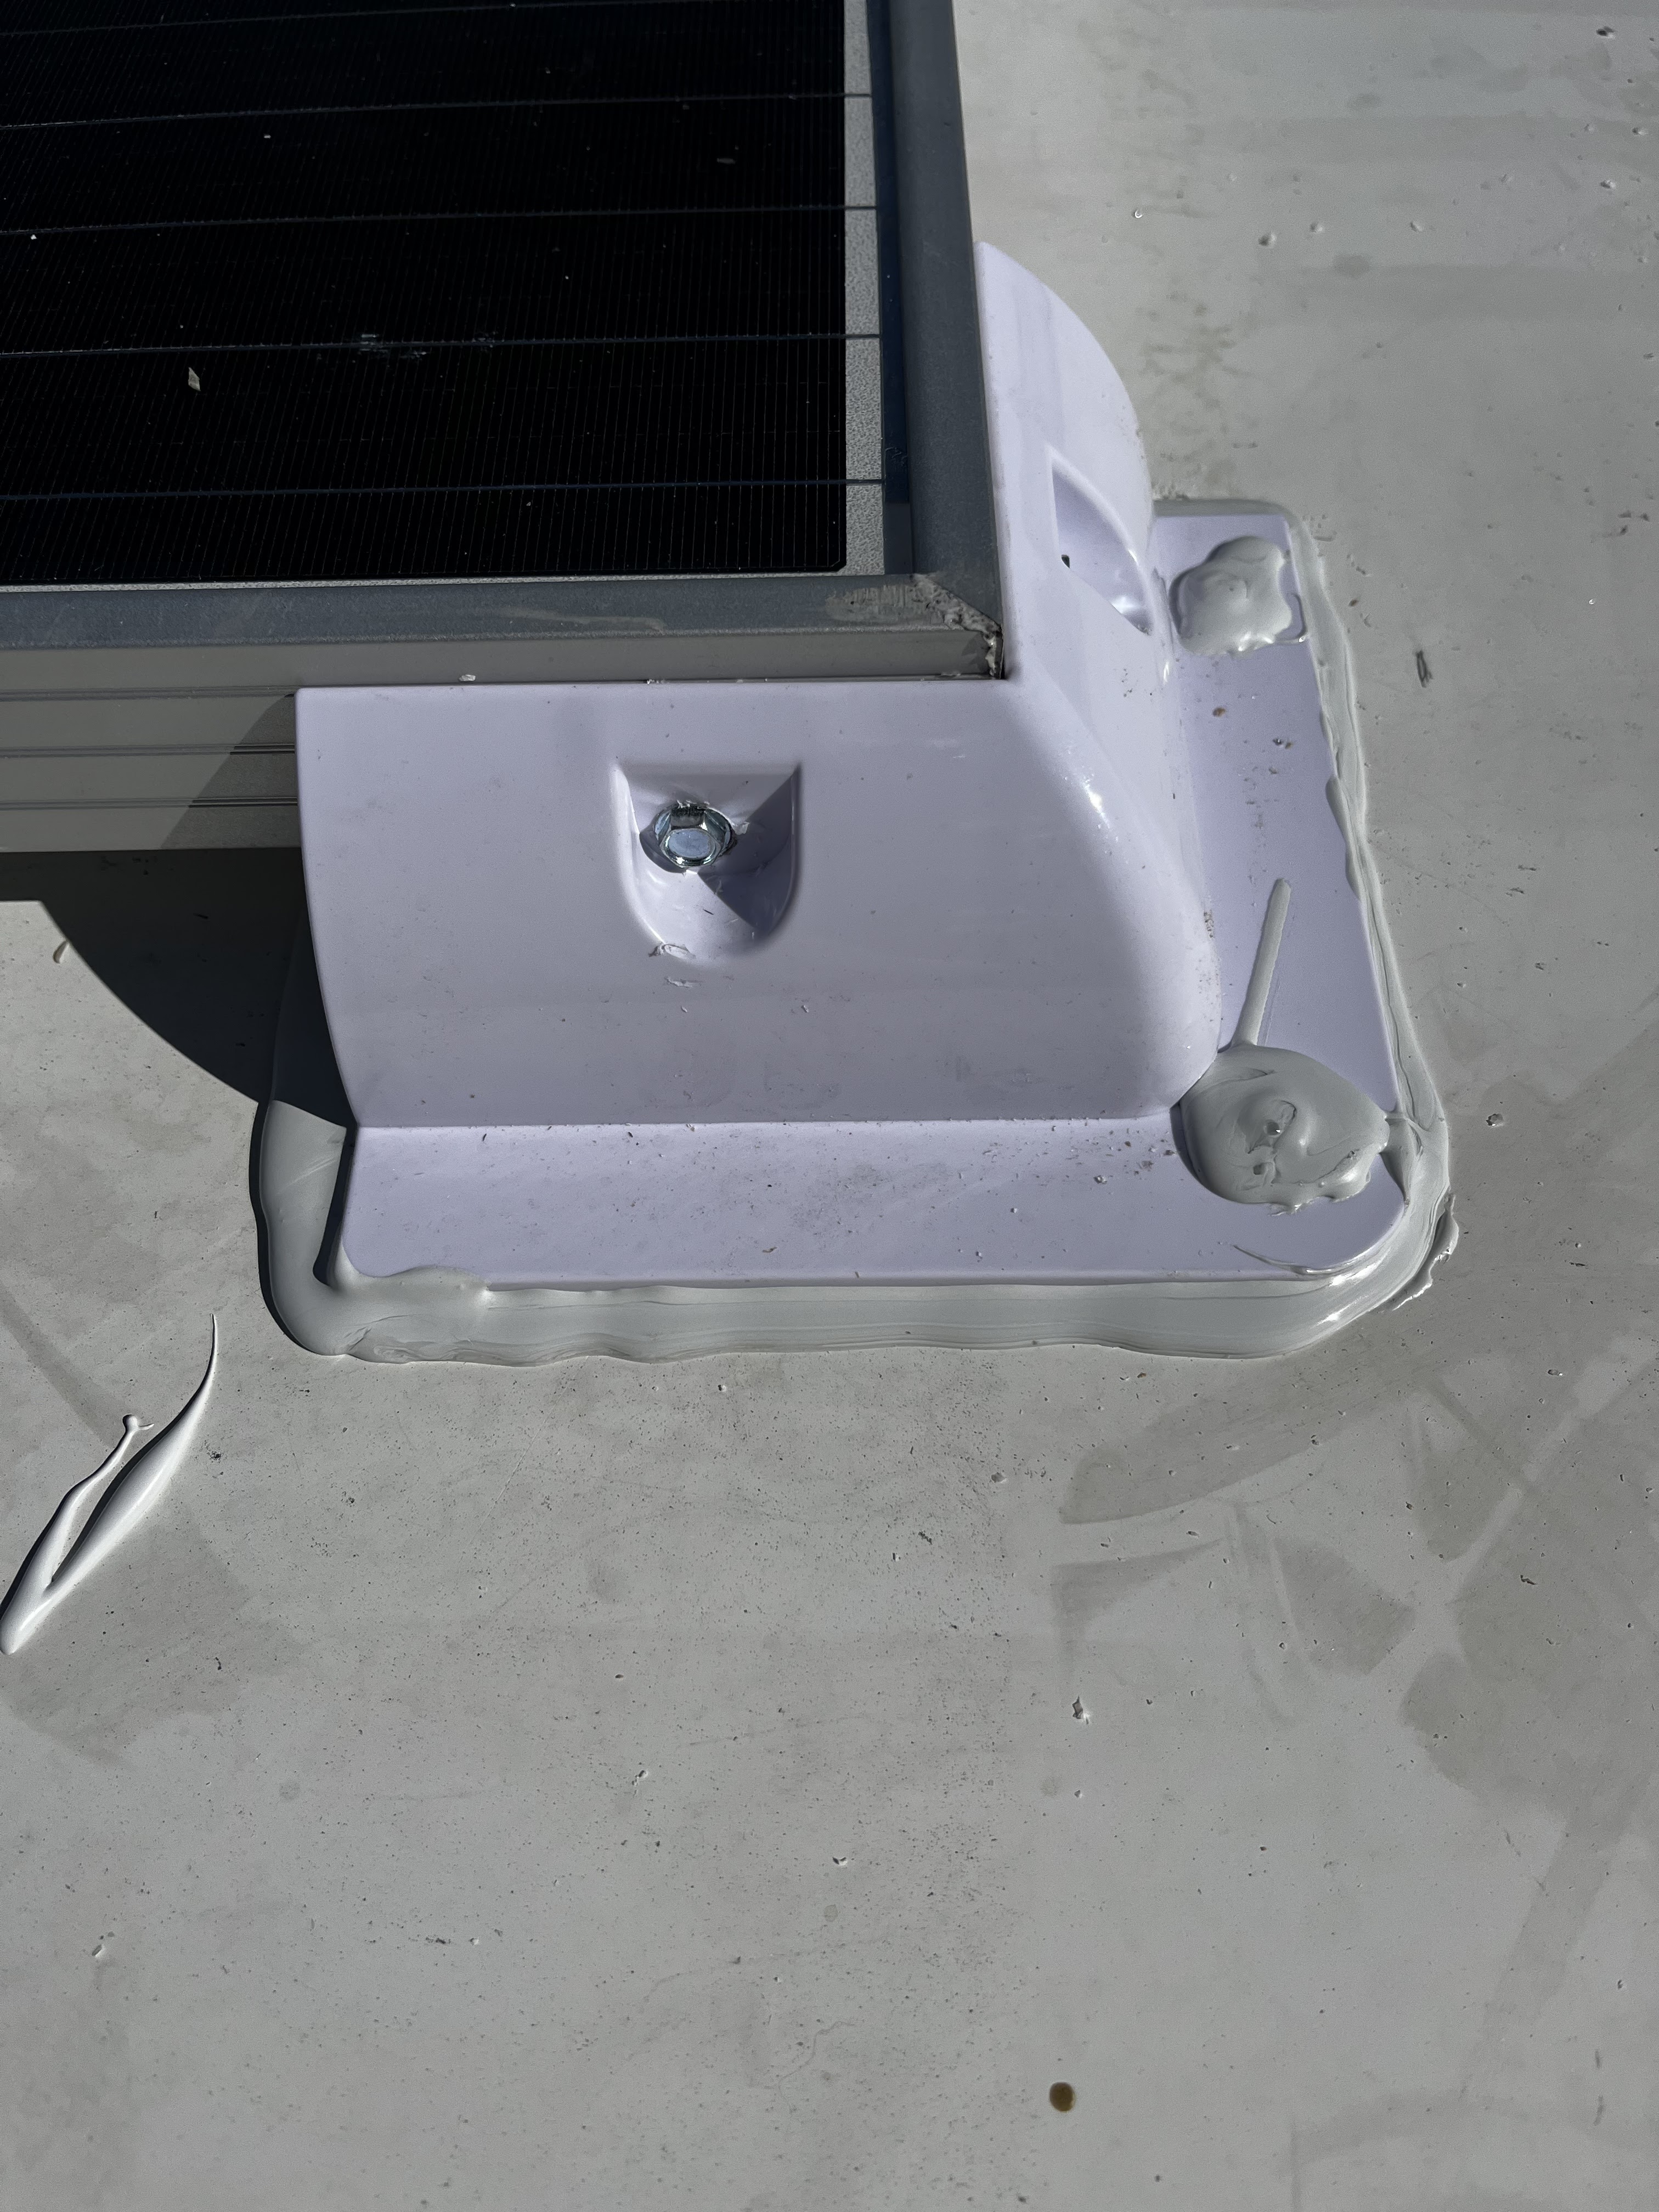
Friday - A slow start this morning as the temperature was in the mid-40s. After the early test session, I started working on the solar panel. I cleaned the plastic mounting brackets and the roof and used some high strength VHB double sided tape. 

I mounted this panel near the front to avoid shading from the front A/C unit. I still need to dress up the wires. The tape seems to stick really well but if you pull up on the panel, the fiberglass roof just lifts up. So some screws will be needed. 

There is still some room for additional panels though this is the limit of this charge controller. Another one will be needed if additional panels are installed. 

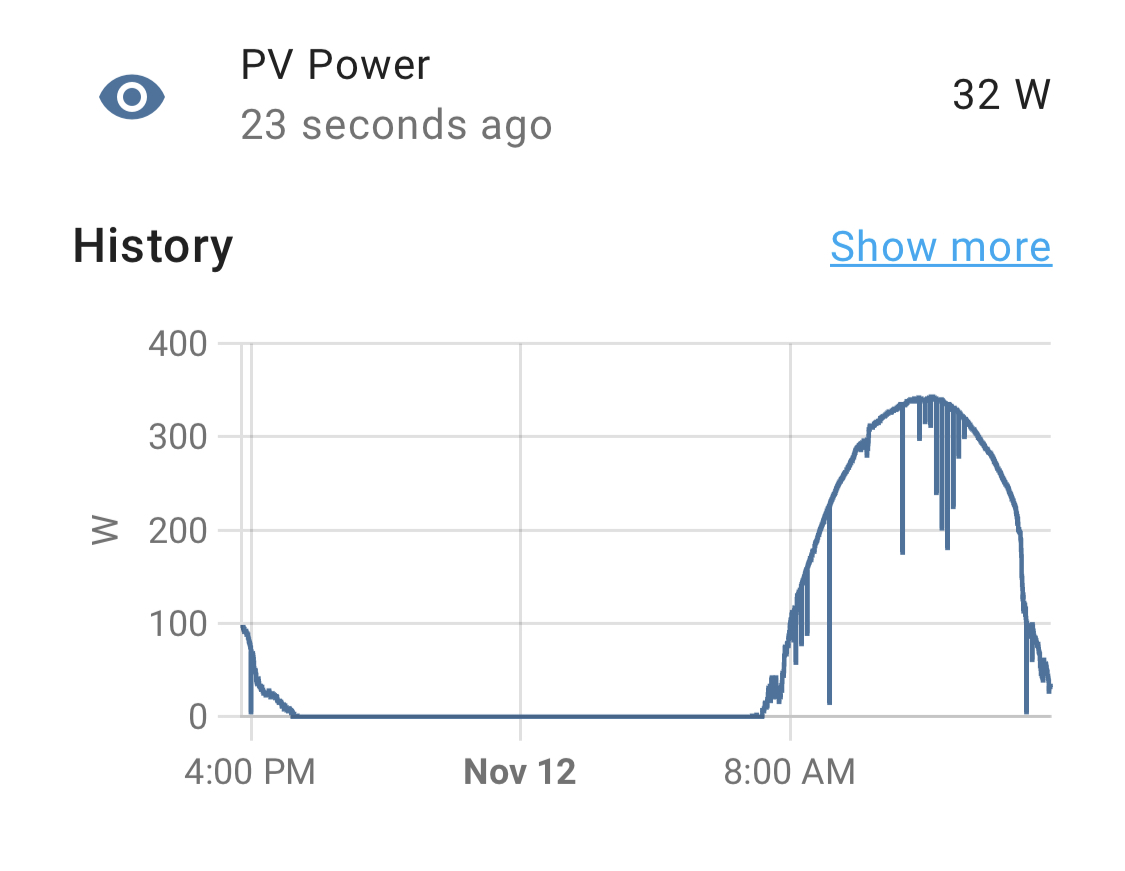
Saturday - I think the forecast for last night was in the upper 30s (°F). I turned the battery charging off last night to allow the batteries to discharge overnight. By morning, they were down to 83%. By 10:30 this morning, they were back up to 100%. The extra panel makes a difference. The three panels were just keeping up with demand and trickling several amps into the batteries.

Well, 350watts is more than I was seeing before. Or less than half the theoretical max for the panels. 

Sunday - A quiet, non-activity day. No projects. Picked up some groceries including some Thanksgiving food. We haven’t really decided what to do but I’m picked up a turkey breast, fresh cranberries, and some dressing ingredients (sausage, water chestnuts, bread, onions, celery). I’ll add some Chinese sausage, dried mushrooms, olives, pecans, and may some wild rice. In other words, it’s time to clean out the pantry. 

Saturday, April 17, 2021

Day 32, 33, 34 - Benson, AZ - TT

Thursday (32) - I'm doing the morning test session while sitting outside. It's a very pleasant 73°F with high cirrus. Very pleasant temperature. There is a wind advisory for this afternoon so I brought the awning in. So far, not a lot of wind.

It's now 2:00 and almost time for the afternoon test session. Since the awning is still in, it's too hot to sit outside. The errand of the day was just groceries at Safeway.

Friday (33) - The day started out on the cool side but had warmed up to 73°F by early afternoon. There is another session this afternoon but enough time to use the pool. The solar panels are supposed to be shipped out today from Indiana where they are manufactured. So I should get them next week. Hopefully, there will be enough time to install them while we are here especially since I want to give the Sikaflex plenty of time to dry. 

I’m still thinking of the “best” route from the roof to the charge controller. Since the controller is in the rear-most bay, I’m thinking of just dropping the cables through the closet, into the engine compartment then over into the bay. The solar cables are only 10AWG so not very heavy at all. This is one of the advantages of serial connecting the panels. High voltage and low current. The cables are UV resistant and rated for 600VDC so my 76VDC and 10amps should be fine. 

Saturday (34)
 - A clear blue sky day and a very pleasant 70°F for the morning test session and 75°F for the afternoon session. We just spent the last hour or so at the pool. Hopefully, the wind doesn't pick up anymore so I don't need to pull in the awning. 

This is the view behind the RV site. No houses or other RVs so it's pretty quiet. 

This is my current project. I picked up a new Raspberry Pi3 B+ and a 7" touch screen. I installed the Victron Venus distribution and added the software to support the touch screen. I had previously ordered the Victron VE.Direct USB cable and have it plugged into the BMV-712 battery monitor and the Pi. To monitor the Victron charge controller, I just ordered another VE.Direct USB cable and a 20' USB extension cable. If that isn't long enough, I could add a powered USB hub. It should work as the limit, according to Victron is 10m. It's just serial communication so the speed isn't as important. To get the upper part of the graphic working, I'll need to replace the inverter which I plan on doing anyway.

Friday, April 2, 2021

Day 18, 19, 20 - More Solar - Bisbee - Benson, AZ - TT

Thursday (18) - 84°F today!

With the charge controller in the passenger-side rearmost compartment, I need to re-think the placement of the solar panels. Instead of placing them towards the front of the RV, I will locate them all on the driver-side between the two A/C units. Hopefully, this will avoid shading from the A/C units. This will result in 55 ft of 10AWG wire between the panels and the charge controller. This includes both the positive and negative cables. From the chart and ohms law, we get a voltage drop of 0.515 volts or 0.76% loss with the panels wired in series. If I connect the panels in parallel, the resistance would be 3x higher but the loss would be almost 12% due to the lower voltage. This would require much heavier gauge wire from the roof to the charge controller. This is why I’m wiring the panels in series. 

After the morning test session, I put 4” wide Eternabond tape over the Dicor on both of the vent installations. Next week, I’ll put more Dicor on the edges of the tape. 

This picture also shows where I’m planning to install the solar panels. Since I try to have the driver's side of the RV facing south, putting the panels on this side minimizes the possibility of shadows on the panels. A shadow on even one panel could pretty much shut down all the panels in that series connection. But, that’s the trade-off between serial and parallel connection for your panels. The benefit is a higher voltage and lower current. I.e. cheaper wiring and you aren't so constrained by the distance between the panels and the charge controller.

Friday (19)
 - Today, we spent the day at Bisbee, AZ, an artsy town southeast of here. We went down with Rich and Hope who are staying at the Escapee park about a quarter of a mile down the road. We had met them last Thanksgiving near Lake Whitney, Texas. He is a fellow ham radio operator and they are full-time RV travelers. 

Lots of shops such as this honey store. It was not much wider than their front door. We had a tasty lunch at the Bisbee Coffee Company right on the main street. 

Saturday (20) - This morning, I went with Rich to another RV park in Benson and helped finish a handicap ramp up to a 5th wheel RV. Another couple, Garrett and Carolyn had started and finished much of the framing and most of the decking. We finished the decking, finished the handrail, and primed the raw wood on the handrail. 

Afterwards, Bridget and I headed into Tucson to color Easter eggs with Garrett and Carolyn’s three kids while they were doing their livestream. Their YouTube channel is Diary of a Family

Wednesday, March 31, 2021

Day 15, 16, 17 - Visiting Friends and Solar

Monday (15) - After the morning test session, we drove into Tucson to visit friends at the KOA RV park. The place is huge. We have a reservation at this park in a week and a half for our week out of the Encore system. After a week, we can return to any Encore park including Benson. I believe that is the plan.

Yesterday, we replaced the Fan-Tastic fan in the kitchen/living room with a MaxxAir fan. This one has a built-in rain cover as well as a remote control and thermostat. The removed Fan-Tastic fan will be replacing the vent fan in the bathroom. I believe that is tomorrow’s project. I will cover the screws and the edges with Dicor and maybe re-install Eternabond tape over the Dicor.

Tuesday (16) - We re-installed the Fan-Tastic vent fan in the bathroom. It is much quieter and has a temperature sensor but does not have the motorized lid like the new one. Still an improvement. We were done before lunch and I’m relaxing in the pool since it is a warm 81°F right now. I have a test session starting in an hour or so but for now, relax. 

A few more solar pieces arrived. The DC shutoff from the panels to the charge controller. Since the max DC voltage with the three panels in series will be almost 80VDC, it was difficult to find a reasonably priced switch or breaker rated for that DC voltage. The current is only 10amps. I found a four-pole switch rated at 1000VDC and 36amps. Serious overkill. Other items include a circuit breaker for the charge controller to the batteries. I needed 60amps and up to 16VDC. I found 80amps at 48VDC. That’ll work. The next item is the Victron battery temperature sensor. It turns out that our friend, Garrett, had ordered one that he didn’t need. I could’ve bought it from him. The temperature sensor is needed for lead-acid batteries. Not needed for lithium. Only a few more parts and pieces.

Wednesday (17) - Sitting outside on a sunny morning. It's only 63°F but there is no wind. The test session starts in a little under an hour so I usually join early to talk with some of the others. A little socializing.

My afternoon project was installing the charge controller and going through the configuration. The solar panel shutdown switch is to the right and it will disconnect both positive and negative cables. 

The charge controller breaker is in the battery compartment, the next compartment to the right. It is wired before the main DC power switch as you need to remove the input from the panels before turning off the battery power. I plan on printing instructions for powering up/down the charge controller. 

I’ll be installing one of the 8266 microprocessors in the compartment with the charge controller to monitor the heat sink temperature and the ambient temperature of the compartment. 


Sunday, March 28, 2021

Day 14 - Solar Overview

I had been procrastinating installing solar on the motor home for a number of reasons. The rig seems unsuitable for any real boondocking but dry camping is another story. It has a 7.5kw diesel generator which, while useful, is rather noisy especially when at some Harvest Host locations. And lastly, I really didn't want to drive screws into the fiberglass roof. Based on my experience, there is a chance for cracks to form when screws are driven in.

I procrastinated ordering the panels themselves and they are now on backorder for about three weeks. They are being shipped to a friend's home in the PNW. Over the next month, I’ll be able to install everything except the panels themselves including the wiring onto the roof.

  • 3x 210-watt Hi-Tec monocrystalline panels
  • Victron Energy SmartSolar MPPT 100/50 charge controller (3rd picture)
  • 100’ 10AWG UV resistant solar cable. This will run from the panels to the shutoff 
  • 2x Solar Cable waterproof entry gland (only need one)  (3rd picture)
  • 8x MC4 connector set for 10AWG solar cable  (3rd picture)
  • 2x 10’ 6AWG welding cable w/10 lug connectors and shrink tubing  (3rd picture)
  • 3x corner and side mounts to be glued to the roof (2nd picture)
  • Sikaflex-259, a 1 component, moisture-cured, polyurethane adhesive?(2nd picture)
  • Solar DC isolator switch. 1000v/32amp
  • 80amp circuit breaker
  • Victron battery temperature sensor
The corner and side mounts will be screwed into the sides of the panels using SS hardware. The mounts will be fastened to the fiberglass roof using the Sikaflex. No drilling required. Two of the panels will be in front of the A/C starting on the drivers side of the roof and the third will be right behind to the left of the A/C. 

The three panels will be wired in series. Panel specifications, Voc=24.9VDC, Isc=9.85amps. So max voltage and current into the Victron charge controller would be 74.7VDC and 9.85amps. The maximum charge current to the batteries would be 50A limited by the charge controller.

The 10AWG cable will be run from the MC4 connectors on the panels to the DC isolator switch. The estimated distance is 25’. Counting both positive and negative runs, the voltage drop over the 50’ of cable is under 1VDC. Reasonable considering the panel output voltage is around 75VDC. 

The 6AWG cable will be run from the output of the charge controller, through the 80amp circuit breaker to the batteries. The voltage drop would be about 0.7VDC if the charge controller was 10’ from the batteries. 6AWG is the largest cable that the Victron 100/50 supports so the controller could be closer to the batteries. The temperature sensor replaces the power cable on the 500amp shunt for the BMV-512 battery monitor that I had installed over a year ago. The temperature and battery voltage is fed up to the battery monitor and relayed to the charge controller via Bluetooth. This allows the charge controller to modify its charging parameters depending on the battery temperature and the actual voltage at the battery terminals.

On the “average” dry camping day, we use about 240 amp-hours. These panels should keep up on most days. But we always have the diesel generator for cloudy days. At our last HH overnight, we used 175 amp-hours including some microwave and Keurig use. The majority of the power was used by the two propane furnaces with temperatures in the high 30s (°F). So we use much more power than we did with the 5th wheel RV. For now, we will continue to use the 4x flooded, 6V golf cart batteries which give us 210 amp-hours of useable capacity. 

Saturday, February 16, 2019

Day 39 - Getting Prepped for More Solar

Went up on the roof today to measure the spot I am planning to put the new solar panel. You can see the location of the existing junction box. I’m pretty sure that the brackets will allow the new panel to fit over it. In case it doesn’t, I have several backup options. The tape measure is set to the length of the new panel. It is about 6” wider than the other panels so there is plenty of space.

As a refresher, I pulled out the MC4 crimp tools and installed a connector on each end of the leftover cable from the original solar panel installation. Since I needed to make cables for the new panel anyway, this just helps the process get started. The cable itself is 10 AWG with UV-resistant insulation and is designed for use in solar installations. By “designed”, I mean the insulation is the proper size for the MC4 connectors. These are most of the tools needed for crimping and I have the two MC4 connectors shown below the crimp tool.

First, the pieces for mechanically securing the cable to the connector are put in place before crimping the cable. The insulation is stripped off enough so that just the tip of the bare copper wire goes into the body of the pin. This is just so that stray strands don't get caught in the connector.

The pin is crimped using the ratcheting crimp tool specifically made for these connectors. What I did not show was a little bit of the Ox-Gard anti-oxidation compound was put into the area of the crimp before going into the tool. I didn't include a picture of the crimping process as it takes at least two hands to make sure things stay in position during the crimping process. The crimped pin is inserted into the back of the plastic connector until you feel and hear it "click" into place.

The silicone ring, plastic teeth that grip the cable jacket and the knurled nut are put onto the back of the connector. These are plastic wrenches that are specifically designed for MC4 connectors to tighten the knurled nut. The two prongs at the end of the plastic tools are used to disconnect the connectors as the clips are recessed and almost impossible to reach without these tools.

Success. I did still remember how to install the MC4 connectors. I still have two more pairs of connectors and depending on how I end up connecting the new panel into the system, I either need one pair or none. UPS says that the panel and brackets will arrive on Tuesday. Another fun project and I can drill more holes in the roof...

I just made an RV park reservation for the middle of March in Orange County. Definitely no boondocking around there. I needed to send a picture of the RV before they would finalize the reservation. I hadn’t run into that in a while. BTW, they said the RV looked fine.

Thursday, February 23, 2017

BBBC 2017 #23

This post is part of ToadMama's Brave, Bold, Blogger Challenge (BBBC) 2017 which is an attempt to make February go by a little more quickly. There are 28 topics, one for each day. 


Share a photo taken from your front door today

It just started snowing again and we are forecast to receive about 16" over the next couple of days. The orange cord is running to the back of the house to the solar panel that I'm using to test the charge controller. This picture is taken from the front porch looking up the driveway towards the subdivision road. The pile of snow on the right-center is the grill. It's not getting much use these days.

The picture below was taken from the garage showing the modest accumulation of snow this afternoon. All of the tracks are from the Prius coming and going throughout the evening so you can see that we got a maybe a couple of inches of the fluffy stuff.


Was There Enough Sun?

At 9:00 on Tuesday morning after several days of essentially solid overcast, the battery bank was down to 81%. When I checked at noon, it was being charged at 6.9 amps according to the Trimetric monitor. By 5:00pm after the sun was behind the trees, the Trimetric monitor reported that the battery bank was still down by 33 amp-hours and the bank was at 92%. Not too shabby for only a single panel in Alaska. I turned off the inverter since the forecast is calling for a week of snow. Even though it has been heavy overcast or snowing most of Wednesday, the panel still produced enough charge to get the battery bank up to 94%. So, no, there wasn't enough sun in one day to completely charge the battery bank.

I did get the combiner box mostly assembled. This is a waterproof junction box that will be screwed onto the roof of the RV. Once I get it positioned, a hole will be drilled in the bottom of the box into the roof for the 4 awg wires that lead to the charge controller in the storage compartment from each of the short bus bars in this box. The 10 awg wires from each pair of 100 watt panels will be brought in through the waterproof connections that thread into the pvc fittings on the bottom of the picture. The box cover with it's seal is seen above the junction box. The short bus bars are made for both the two sizes of wire. The box is PVC so plastic cement was used to assemble the box and the two bus bars will be screwed in from the bottom. I think there might be room in the box for two inline 15 amp fuses. One for each pair of panels. And there will be another short bus bar for the ground wires. With all of that the box will be pretty packed. If I decide to install additional panels, there is a 4" tall junction box available at Lowes instead of this 2" box.