Showing posts with label Lithium Battery. Show all posts

Wednesday, November 8, 2023

Sweetwater, TX - HH

Wednesday - BTW, this is what LiFePO4 batteries look like when they are almost dead at ~5% SoC. The voltage drops dramatically. This is why they took so long to charge yesterday. 

Today’s short (213 miles) drive was to Sweetwater, TX, and I’m parked at the National WASP WWII Museum. It’s a cool museum with free admission. I’m told that there is a donation box. 

Several planes used for training including this twin engine Cessna. 

It was pretty windy both yesterday and today. Sometimes it was a head wind but today it was mostly a gusty cross wind. Not ideal. At 88°F, it’s nice to relax in the A/C here in the museum. Plus, there’s free WiFi. 

Tomorrow, it’s 270 miles to Hondo. It’ll be good to finally arrive. 


Tuesday, February 7, 2023

Yuma, AZ

Sunday - We had a short travel day south to Yuma, AZ. We are mooch-docking at Carolyn and Garrett’s friends home outside of Yuma. They have enough room for two RVs in addition to their 5th wheel. They ran us a 15amp extension cord which is enough to keep things charged up without running the generator. 

It is a very pleasant 73°F right now with a very light breeze. The high is forecast to be 77°F! Quite the improvement from Benson. I went to the grocery store to stock on food as in few days, we will be headed out to another BLM area. 

Monday - Excitement (for me) last night around 1am. The RV was completely dark. I went out and checked the batteries and the BMS indicated that it had disconnected the batteries due to a "Short Circuit". I restarted the batteries using the small Antigravity jumper pack that I used to carry on the Ural, and the BMS went out of protect mode. I turned on the main shutoff switch and shut off charging on the inverter control panel. After the HomeAssistant server re-started, I looked at the data and things shut off when the batteries were just fully charged off of the inverter/charger. I had changed some of the charge parameters when we were boondocking to enable the batteries to charge to 100% from the generator though I never ended up using it to charge to 100%. We are plugged-in to shore power now and the inverter-charger used those new parameters. 

I reset the settings back to the way they used to be. 14.3V constant-current, 80amps max, 12 minutes absorption time, 13.8V constant-voltage, 12.9V restart bulk charging. I'll try charging again today after solar is done.

Almost made it back to 100% SOC! They went from 77% to 97% in one day. Today’s total was 2.6KW-hours and that is the most we’ve been able to get from the solar (so far). The max sun elevation was only 41° today. The elevation will be ~80° on the summer solstice. 

Tuesday
 - Based on this graph of battery voltage and current, I adjusted the output of the inverter/charger to not charge the battery to 100%. The sharp spikes are from the BMS shutting down the battery since it is fully charged.

Absorption voltage=14.1V, absorption time=6min, charged voltage=13.8V, re-bulk voltage=13.0V. We’ll see if this works better.

Today’s adventure was the Yuma Territorial Prison State Park right along the Colorado River. It has a nice museum and was very advanced for its time. Pictured is a guard tower and it is sitting on a large cistern that supplied the drinking water. The prison had electricity before the town and supplied power to Yuma after 9pm. The prison hadn’t been used as a prison for over 100 years but it did serve as the high school. Their athletic teams were called the Criminals.


Wednesday, December 21, 2022

Road Trip - Part 1

Tuesday - I tested the temperature controller with the 24watt silicon heating pads. I think these should work fine. I initially tested the controller around ambient temperature with a shutoff temp of slightly higher. I then held the thermistor and it shutoff in seconds. I think these Amazon bargains should work fine. Total of $31 for two controllers and four heat pads. (Spare parts!). 

Wednesday - This morning, we headed west towards California. Our destination for today is Palm Springs which makes tomorrow’s trip into (and through) L.A. much shorter. Todays trip was just over 400 miles with Goggle routing us on a southerly route before heading north west of the Salton Sea. 

Dinner was at Sherman’s Deli at the suggestion of Brian and Michelle from LivinRVision YouTube channel. They said that this is the pie that all others are compared to. We’ll see…

BTW, the pie was not dinner.

Monday, December 12, 2022

More Monitoring…

Sunday - I’m still closely monitoring the charging from the Magnum inverter/charger. Ideally, it won’t charge the batteries to 100% every time while we are connected to shore power. I have been adjusting the absorption voltage, absorption time (aka CV duration), and rebulk voltage to get the profile that I think would work for us. I initially started with the BattleBorn recommendations. It made a good starting point. Using their settings, both batteries would reach 100% and their BMS would disconnect from the charging source. So, I would turn off the charger, discharge the battery and turn down the absorption voltage. This is the voltage that the Magnum switches from CC to CV. The charging mode shows on the Magnum remote display. 

Right now, it’s set to 14.3V and 18minutes. The switch to CV occurs at around 96% SOC, and the 18minutes of CV takes it up to 99% before the charger shuts down. Actually, CV duration should be reduced to 6minutes.

The rebulk voltage is now set to 12.9V and bulk mode charging started at 80% SOC. That sounds fine. When I had it set to 13.3V following the BattleBorn recommendations, bulk mode charging started at 99% SOC. The SOK batteries are a different cell design than the BattleBorn cells so that may account for the difference. 

The voltage shown on the HomeAssistant graphs is being measured at the battery terminals by the Victron shunt. The voltages being used by the Magnum inverter/charger are within the unit itself. There is approximately 12 feet of 2/0 cable between the batteries and the inverter with numerous interconnects. So while charging, the Magnum voltages will be higher due to resistance in the cable and high current. Discharge voltage should be close as the current is low. When the RV is not connected to shore power, the Magnum measured voltages would be lower than actual battery voltage due to high current through the cables. 

Monday - I’m still trying to decide if I’m alright with this behavior. Charger off until ~2:30am with SOC of 74% (that’s good), followed by two CC/CV charges in the morning at SOC of 94% (not optimal), followed by the solar charging in the afternoon, then another CC charge in the evening at SOC of 82%. I think that this may be the best I can do with the Magnum inverter/charger. To get a more accurate battery voltage, I would need to add a Magnum BMK or shunt. Not for $180…

Saturday, December 10, 2022

Charging LiFePO4

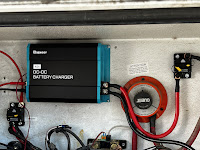
Friday - This afternoon, I installed the Renogy 40amp DC-DC charger including a 50amp breaker on the input side of the device. Just for future reference, the DIP switch positions I used are in the picture. Off, On, On, On, Off for Lithium batteries, 14.4V. 

This matches the recommendation from BattleBorn for the Renogy 40amp charger. Since there is only about 6” of wire on the output side, I used leftover 8AWG stranded wire. The input side has longer leads so I’ll use the 4AWG cables I ordered from Amazon. 

Saturday - The cables and the new Magnum remote arrived yesterday while I was in the hot tub. The air temperature was 53°F so, needless to say, I was the only one there. 

Around 11am, I switched off the main AC breaker and turned off the inverter. With the DC power still connected, per instructions, I plugged in the new remote panel. It ran through its initialization process and verified that the Magnum ME2012 was firmware v5.94. According to what I’ve read, this is sufficient to provide a CC/CV charging profile.

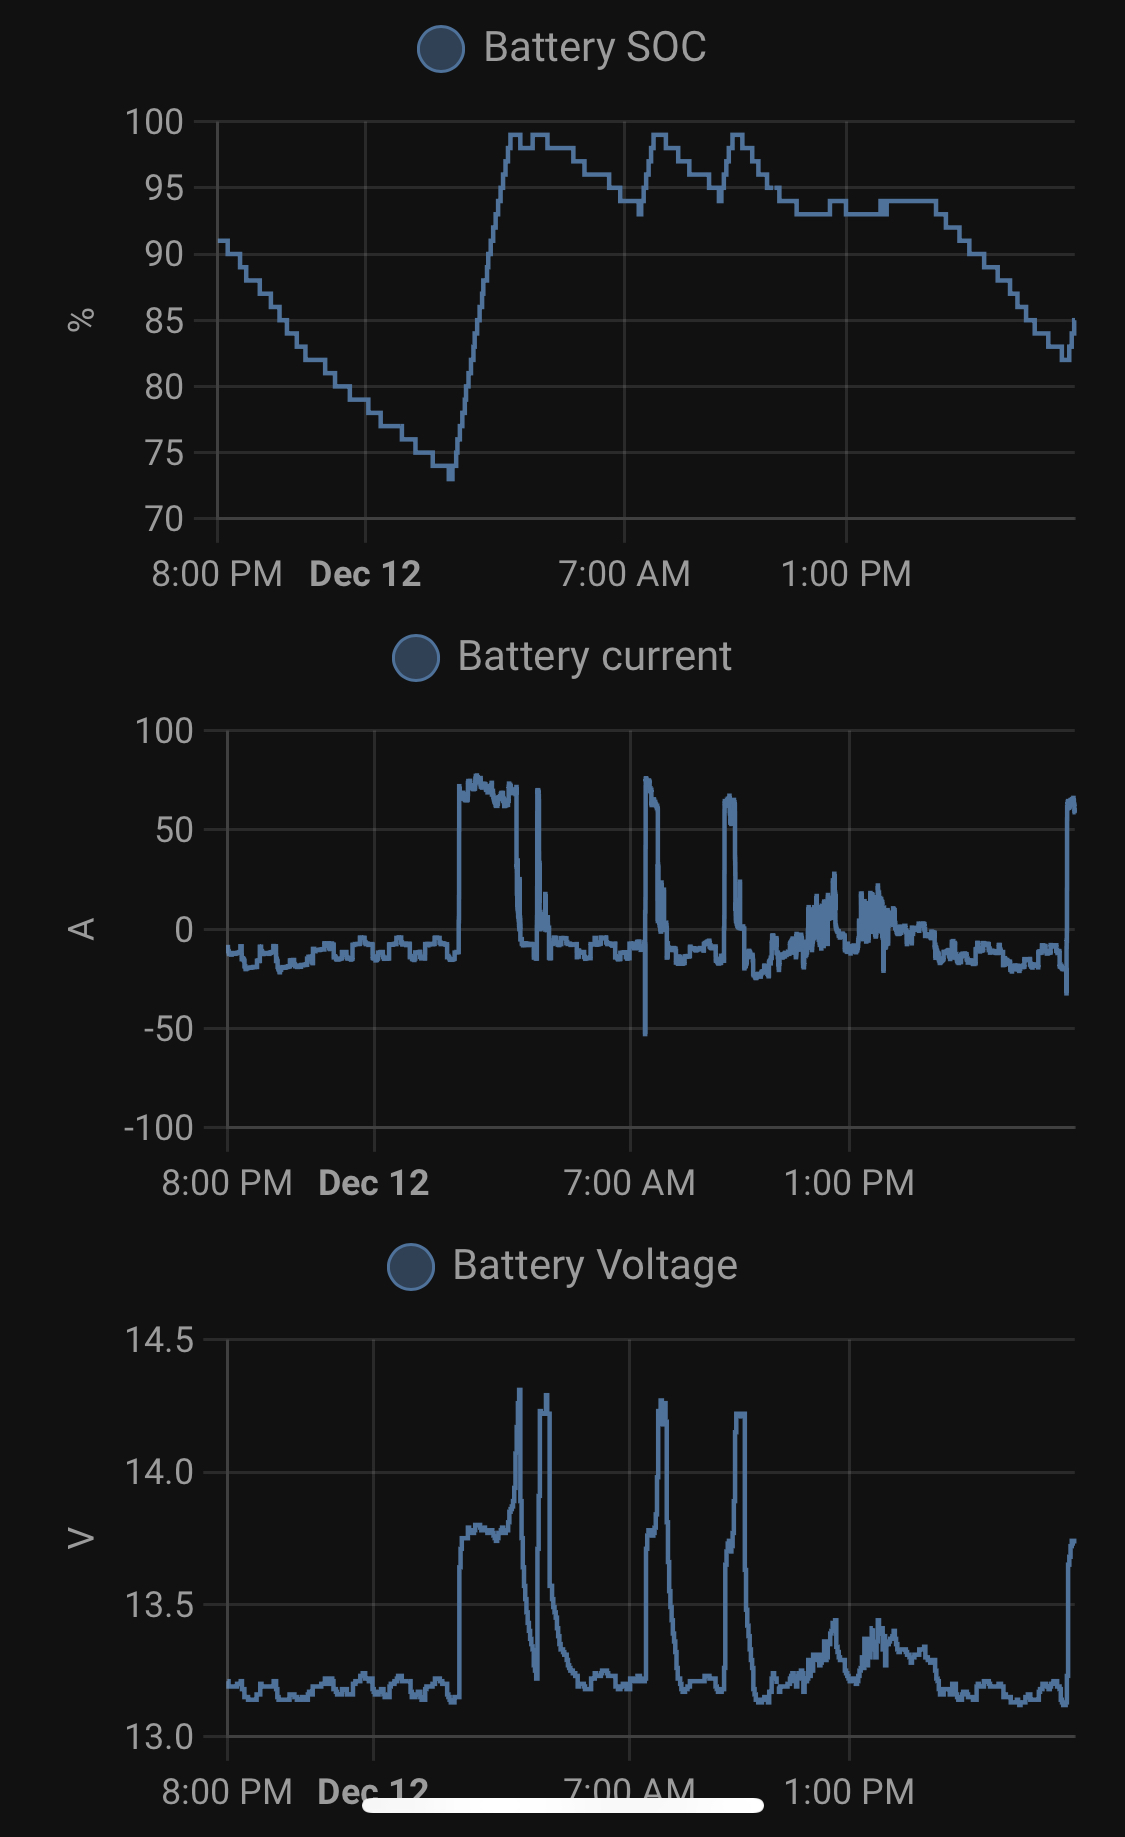
CC/CV is Constant Current/Constant Voltage. The Magnum is now set up to provide up to 90amps until it reaches the set absorption voltage, which I set to 14.3V. At this point it switches to constant voltage and will maintain this voltage for 0.1hrs. This time is adjustable. You guess on the time to allow the batteries to get fully charged. Since the Magnum is measuring the battery voltage internally, it will read higher than actual battery voltage while charging due to resistive losses in the 2/0 cables. This is about 0.2V at 90amps. After this, the charger goes into “Silent” mode until the battery voltage drops to the “ReBulk” voltage which I have set to 13.0V. According to a table, the is about a 40% SOC which is really low. I tried 13.1V and bulk charging started at an SOC of 99%. All of these parameters are adjustable with the new remote. The short CV time and “Silent” mode are recommended as we have alternate charging options and the allows the batteries to cycle.

I also have the DC-DC charger installed. I just need to run the trigger wire into the next bay and find an appropriate source. Such as the tail light. That way the coach batteries won’t be charging from the engine right after the engine is started. 

BTW, the hydraulic crimper does a fantastic job. This is one of the 4AWG cable for the DC-DC charger before it’s covered with heat shrink. This has been a fun project. 


Thursday, December 8, 2022

Battery Project Continues

Tuesday - Yesterday's bulk charge with an absorption voltage of 14.6V proved to be on the high side. Especially with an absorption time of 90 minutes which is the shortest setting available with the current Magnum remote. This triggered the BMS (Battery Management System) on one of the batteries to go into "protect" mode. Essentially disconnecting it from charging. I switched the battery type to gel on the Magnum and turned off charging. After about ten minutes, the battery, the battery came back online. and they both discharged until around noon. I turned the charger back on and it proceeded to finish the 90-minute absorption time before going into float. 

When the Magnum switched to "float" after the 90min absorption, it stopped supplying current to the batteries as the solar controller was still in "bulk" mode as its absorption setting wasn't reached. The Victron solar charge controller does have a LiFePO4 profile and it is set with an absorption voltage of 14.4V and an absorption time of 15 minutes. And a re-bulk voltage differential of 0.4V so it'll start charging again when the voltage drops to 14V.

Wednesday
 - Todays tasks were removing the batteries and installing the battery disconnect switch and painting the battery box. The switch was installed on the side wall of the bay next to the solar charge controller circuit breaker. The box was also disassembled and glue was added. Steel eyelets were installed for a ratchet strap to anchor the box and batteries. I only painted the sections of the box that I couldn’t get to easily when the box is in the bay. Especially where the wood contacts the steel bottom of the bay. 

Thursday
 - Participated in the morning test session before going for a walk around the park. I have an Apple appointment later on today as my iPhone 13 Mini doesn't want to power on. I moved the SIM card to my old iPhone X and after a while, it started working on AT&T again. Maybe because the hardware identifier within the phone changed. I believe that the phone is still under warranty as it is less than a year old. 

Update - The iPhone 13 Mini started to work again so I cancelled the appointment. I also finished painting the box and added some aluminum trim to the lid. The ratchet strap is to hold the box and batteries in place. Still a little more work before this project is finished. 

Monday, December 5, 2022

Magnum Issues

Warning, very tech-y post...

Sunday - The Magnum inverter/charger ran on the “Flooded” setting yesterday and it got the batteries up to 14.6V in absorption mode. It then dropped to float and kept the batteries at 13.4V for the next four hours. After four hours, the charger switches to “battery saver” or standby where the current drops to zero. By design, the charger will remain on standby until the voltage drops to below 12.8V at which time another four-hour float mode is initiated. Current will be supplied to get the batteries back up to 13.4V.

The problem with this system is voltage won’t drop to 12.8V until the state of charge (SOC) is ~17%. Clearly, this isn’t going to work. Today, I turned off the main breaker for a few minutes and when I turned the breaker back on, a four-hour float charge cycle was initiated. This got the SOC up to 82% from 60%. 

Monday - Today, the goal was to get the battery voltage down to around 12.7V. At this time, I can turn off the main breaker for five minutes. When AC power is switched back on, the Magnum charger should go into bulk/absorption and charge the batteries up to 14.6V before switching to float. 

This happened at 6:18pm. The voltage was down to 12.68V. I turned off the main breaker for 5min. After it was turned back on, the charger went to bulk charging mode at 100amps, of which 70amps were going into the batteries. The remaining 30amps were the 12V draws within the RV. When the batteries were fully charged, the voltage jumped to the absorption voltage and the current dropped to zero. The charger will sit in the absorption mode for an hour before dropping to the float mode for four hours. After this, the charger will shut down. This was a test to see if I understood how the Magnum inverter/charger works. If dry camping, the generator would end up running for five hours to charge up the battery bank.

I did go out and check temperatures and all was good. No hotspots. The Victron temperature sensor on the negative post registered a max of 107°F at the end of the bulk cycle. The warmest thing was the inverter/charger. 

I think I have found a solution to this problem. The inverter is a model ME2012 with version 5.9 firmware. I ordered a new wired remote panel which should have more options. At least enough to create a custom charge profile compatible with LiFePO4 batteries. The remote has been ordered. 

Saturday, December 3, 2022

Battery Project - Part 2

Thursday - Worked on the battery compartment for most of the afternoon. Two coats of Rustoleum paint and then fitted 1½” of foam around the battery holdown brackets that are welded to the bottom of the bay. A layer of 1” and a layer of ½” foam will be followed by a piece of ½” plywood that the batteries will rest on.

Friday - In the middle of the battery project, I paused to build a house. Dave, one of the work campers here, made all of the gingerbread and it was pretty tasty. Way better than the kits I usually get. 

But back to the battery project. I made an insulated plywood box for the batteries and sized the box to allow one more battery. The cables are 2/0 AWG welding cable. I used pocket screws to assemble the box. This is the first time I’ve used them. 

I’ll use 1” rigid foam to fill in the space for the space reserved for the third battery and possibly remove everything to paint the plywood. I also need to order a main 12V shutoff switch since the relay is not functioning. 

We have an older inverter, a Magnum ME2012 with a ME remote. There is no lithium battery type within settings. The “Flooded” profile has a bulk/absorption voltage of 14.6V which is at the upper end of the recommended voltage. The AGM profile is lower than recommended at 14.3V for bulk/absorption but the float voltage is way too low at 13.1V This means that the Magnum ME2012 will not fully charge the new batteries. The Victron solar controller does have a lithium profile so it'll make up the difference. I have it set to “AGM” for now but may change it to “Flooded” later.

Saturday
 - This morning after the test session, I hooked up the batteries. After turning on the charging function of the inverter, I monitored the battery voltage on the BMV-712. I removed the Magnum battery temperature sensor as that would cause the bulk/absorption charge voltage to deviate based on temperature and raised the max output from the charger to 100amps. According to the lithium battery sites, we don’t want the temperature feature. 

The project is about 75% done. I still need to install the battery cutoff switch (just ordered yesterday) and the DC-DC charger and 50amp breaker. The DC-DC charger is for charging from the engine on long drive days. 

I’m also planning to paint the box and fasten it down to the bottom of the bay. Even including the box, the new system is over 150lbs lighter than the old flooded golf cart batteries and over twice the capacity. It looks like the Magnum works as advertised. It stopped charging at 14.3V. More on the Magnum later…


Wednesday, November 30, 2022

Battery Project - Part 1

Monday
 - Now starts the planning process for the battery installation. Since the battery bay is an uninsulated compartment, I will be building an insulated box for them. 

The bottom of the battery bay is sturdy metal and Home Depot has 1” rigid insulation in 2’x2’ pieces. I think that’ll work for the bottom of the box. A piece of 1/2” plywood will distribute the load onto the foam. The box itself will simply be 1/2” plywood with 1/2” insulation inside with the same construction for the top. 

I’ve identified most of the cables shown in the first picture and I want to relocate a couple of them that will be hard to access once the box is in place. The large, cylindrical relay on the right will be removed and replaced with a DC-DC charger. This relay is energized when the engine is running to allow the engine alternator to charge the coach batteries. The alternator is rated at 160amps and the DC-DC charger will limit the current to 40amps. The internal resistance of LiFePO4 batteries is very low and it will max out the alternator (burning it out) and possibly exceed the max charge rate of the batteries (70 amps each). The other purpose of the relay is to “jump” the chassis batteries in case they are dead. 

Wednesday
 - The batteries arrived already, three days before they promised. I checked the voltage on them and they are both partially charged. The batteries also have Bluetooth built into the BMS (Battery Management System) so I can see the individual cell voltages and the internal temperature. This is an unexpected feature. The next screenshot shows how the battery shows up on the phone screen.

At the top of the screen is the SOC (State of Charge) but it won't reflect reality until after a couple of complete charges. There is a switch for heating but I didn’t get that option. At the bottom are the individual cell voltages. Pretty cool! 

The first task was removing the old batteries and wiring them back up to the RV so we still have 12V functionality. Another RVer here in the park loaned me a set of jumper cables so I could temporarily power the RV off of the old batteries. The battery bay has a lot of rust on the bottom where the flooded lead acid batteries were sitting so I'm going to paint the floor before starting to build the battery box. The rust is just on the surface and the Rustoleum paint that I already have says to just remove the loose rust and clean with soap and water. This afternoon, picked up a drill mounted wire brush and used that do get rid of as much of the surface rust as I can. Tomorrow, paint.