Monday, November 26, 2012

Cold, Lazy Weekend

These days, this is now the norm with even colder temperatures on the horizon. The four day weekend was uneventful and sharing Thanksgiving dinner preparation with my daughter in-law was a real treat. I'm afraid that there are no food pics but it turned out well. Enough variety to satisfy everyone and it's nice to be able to try out new dishes.

No work done on the bike even though it would have been a good opportunity to knock off some of the maintenance tasks such as lubing the transmission input spline, changing the brake fluid or rebuilding the carbs. The input spline is supposed to be every other year, the brake fluid every year, and the carbs due to the fact that my mileage has really dropped over the summer. To get to the input splines, the rear swingarm and the transmission need to be removed. I last did the task in March 2010, so it is overdue. By the end of my trip last summer, the transmission needed to be shifted carefully and you can feel the bike try to move forward a bit when it is in neutral. Sure signs of dry splines.

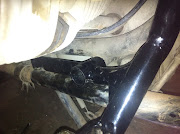
This picture shows how the body is suspended from the frame. The sidecar came with only 4 installed to soften the ride and two of the rubber rings are almost cracked all of the way through. I found a supplier of Cozy parts at nfieldgear.com, an online supplier of Royal Enfield parts and accessories. I think that these are going to be a bear to install.

According to USPS tracking, the front sidecar mount should be delivered to DMC today sometime. I'm not sure what their schedule is like but I'm hoping that I will have the parts by the end of December. I will be down in San Francisco next week and stopping in Oregon on the way back. I could even run up to DMC which is in Enumclaw, WA, a couple of hours north of Portland. But hopefully they would have already shipped the parts by then.

Wednesday Morning Update - Temperatures (and daylight) are continuing to drop. I have been getting out walking around again though I usually opt for a ride in the morning. That way I have time for coffee and, occasionally, breakfast. I will be stopping by DMC aka Dauntless Motors, in a couple of weeks to pick up the modified front sidecar mount, the new crossmember and other miscellaneous mounting hardware. Probably on the 12th on my way to the airport. Actually a six hour detour but it seems worth the side trip.

Tuesday, November 20, 2012

Front Sidecar Mount Removal - Updated

Last night, I tackled removing the front mount from the Cozy sidecar. Everything was pretty well covered with paint and I suspected that the mount wasn't going to just slide out. After loosening the two bolts on the bottom of the tube (two different size bolts), I then needed to use a large mallet to rotate the mount inside the tube. It was pretty well frozen in. I removed the plastic cap from the other side of the crossmember tube and poured in a bit of WD-40. There just happened to be a gallon can of the stuff that someone (not me) had picked up from somewhere. After only about five minutes, I was able to tap the mount free and now I have a WD-40 mess to clean up.

The mount then breaks down into two pieces tied together with this flange and four bolts. I think that the only piece that I need to send in to DMC is the part that fits into the sidecar. The four bolts generic bolts (not grade 8) of two different sizes with no lock washers. I'm starting to see a trend here.

Here is the other half of the mount getting ready to be shipped to DMC in a flat rate box. The shaft itself is solid steel, not just a tube like I expected so it seems to be strong enough though I would have made it a bit longer. I think the flange will be cut off and another mounting system welded on.

I am going to remove the tub and fender this week as a new rear crossmember made by DMC is going to be welded in. It will be convenient to be able to simply flip the frame over and not have to worry about scratching the paint, spatter or overspray.

Monday Afternoon - I shipped off the part this afternoon and talked to Jay about what needs to be done. I think that waiting will be the hardest part of this project.

Tuesday Morning - I pulled the body off of the frame last night. As some have mentioned in the many Internet forums, the Cozy is a bit on the "light" side for my bike. I read that the recommended sidecar weight is about 1/3 the weight of the bike. The Cozy Rocket is right at or slightly under the recommendation. As the curb weight of my R100RT is 567 lbs but thats without any load and the Cozy is listed at ~200 lbs. The smaller diameter tubular frame seems adequate but the stock mounting points really do seem minimal. with the exception of the front mount, the other mounting points for the struts are lugs which simply clamp onto the frame using a simple clamp with only a single bolt. I can see why Jay and others don't recommend using the Universal mounting kit that Cozy sells. The body is all steel and is held on by two rubber mounted clamps on the front cross member and the rear by six rubber rings, that need to be replaced. I heard that it is a bear to get the rings re-attached to the frame but I think that it will be much easier now that the body is off. Something to work on while I'm waiting for the parts from DMC.

You can see the mess I made with the WD40 now soaking into the Oil-Dri absorbent granules. I have the body sitting on a mechanic creeper to make it easy to move around. I still need to remove the fender but was thinking of also removing the wheel as well again to make the frame easier to move around.


Friday, November 16, 2012

Barrow Coastline and IPv6

I went out at today about 1:00pm to take a look the washed out section of road towards Point Barrow. This is looking northeast along the coast in the same area where the road was washed out near the end of October just past the "Road Closed" sign. The buildings in the distance are referred to as "duck camp". On the far side of the buildings is the baleen palm tree that I had photographed before. The ice has a nice blue tint which is difficult to see in this picture. No direct sunlight in spite of it being after local sunrise.

This is looking towards the DEW Line site which also houses some NOAA labs doing atmospheric monitoring. The flat foreground is not water but an old military runway which serviced the NARL facility back in the cold war days. Words that come to my mind when looking out over the tundra are flat, isolated, windswept, cold...

I must be easily thrilled. This capture from a webpage shows that IPv6 is up and running in Barrow. For any not aware of what I'm talking about, IPv6 is the next generation Internet protocol that replaces IPv4, the protocol that the Internet runs on. Over the years I have taught workshops on this topic and I have been trying to get the University to turn on IPv6 system wide. Getting it turned up in Barrow is a start. Getting IPv6 running up here was not my primary reason for coming up but it's a nice addition.

Thursday, November 15, 2012

NARL@noon

I'm in Barrow again this week and after fighting with the new VoIP server (Opensips v1.8.2 on Fedora 17), I decided to take a little walk. This is what NARL (Naval Arctic Research Lab) looks like at local high noon. Still kind of dark due to overcast skies on the southern horizon. Sunrise was at 12:03pm and sunset will be at 2:20pm. Tomorrow, the "day" will be 23 minutes shorter and on Monday, November 19, 2012, Barrow will have it's last sunset until January 23, 2013. This is looking north from the BARC (Barrow Arctic Research Center) facility towards the old power plant.

This is roughly looking south and you can see the low clouds. The wind has died down to only about 15 mph and the ocean near town is now frozen. This is in contrast to only a few weeks ago where spray from the ocean was coating everything with ice. I'm told that the ice isn't grounded yet and you can still see darker sections where it is still thin and if the waves pick up, it could break up the ice. I'll post an ocean view later on.

At the airport in Fairbanks, I ran into another local BMW rider who ended up purchasing the other Cozy sidecar I had looked at to put on his K75. I thought that it needed paint and some bodywork but he is planning on spraying it with bed liner inside and out. It should be a very durable finish and I'm looking forward to seeing it on his bike. He also has an R75 airhead but thought that the K75 would be a better tug. The challenge is finding a subframe.

Thursday evening - Here is a Google Earth image of the NARL campus. I circled the BARC facility and showed the directions that I took the two pictures in this post. The first picture is looking north and the second one, that looks like a lake, is looking south. The blue dot shows that Google knows that I am in hut 268. There is a lake on the southeast of the BARC and another lake south of hut 268.

This satellite image was taken in March 2009 as that is when the Canadian research group was flying the balloons southeast of the BARC. If you look closely at the Google image, you can see the orange balloon next to the shed out on the tundra.

Sunday, November 11, 2012

Front Subframe Installation

This evening, I finished the installation of the DMC subframe on my '83 R100RT. I removed the lower faring on the left side of the bike and removed the two engine mounting nuts. The picture on the right shows the subframe attached to the rear engine mounting bolt. I still need to put the exhaust hanger back on the bolt but I wanted to see how it fit. The loose cable above the frame is the spare clutch cable that I ran before my trip last summer.

Here is the front engine mounting bolt inside of the sleeve on the subframe. The wall thickness of my 19mm socket was too thick to fit inside of the sleeve to reach the nut. I'll need to pick up a thin-wall 12 point socket to tighten the nut. It turns out the the bolts were long enough to accommodate the thickness of the subframe and I didn't even need to remove the Brown sidestand that shares the rear engine bolt on the left side.

The upper mount is a strap clamp that fits over the frame tube and is just below the bottom of the faring. I may end up grinding a bit off of the faring flange for more clearance if it is needed. As it is, there is about 2mm between the eyebolt and the fairing. This was the most challenging part of the installation so far as the heavy metal of the strap needed to be bent to fit over the tubing then clamped to install the two bolts. It seems to me that the eye bolt is a little long. Either that or I have it installed wrong.

I did pick up hardened flat washers for the rear subframe mount on the left side. This is actually where Jay from DMC had mentioned I may need to add some shims due to a slight difference in width and he was right on. As you can see, the subframe hangs pretty low and would really limit how much you can lean to the right. Last summer, I ended up scraping the rear of the brake pedal and the front of the valve cover on roads in Oregon. I guess I won't be doing that again. Anyway, the subframe is essentially installed except for tightening the engine mounting bolts and time to move on to the side car. At least after I get back from Barrow and hear back from DMC.

Monday Update - I did hear back from Jay at DMC and he mentioned that I can trim down the eyebolt on the upper front mount. I wasn't sure I had installed it correctly. He also mentioned a list of items I would need and identified the type of lower mount that I had as they produce a couple of different models. Next weekend, I will remove the front sidecar mount and package it for shipping. I also need measure the width of the frame rails at the rear of the sidecar for a new crossmember and mount. It may be simpler if I remove the body from the frame for a while. It looks like it's coming together.

The steel body tub of the Cozy is suspended on the frame using six rubber rings. The existing rings are cracked pretty badly but I found a supplier of Cozy parts on the Internet, cyclesidecar.com. After looking at the my pictures, I really should clean up some of the dirt that is hidden behind the fairing and still thinking whether or not I should cut the lower fairing for the sidecar mountings. It looks like it may be pretty straight forward.

Saturday, November 10, 2012

Rear Subframe Installation

This evening, I started installing the DMC subframe on my bike. The previous owner included the installation instructions that he had received, just a couple of pages from an ink jet printer. The subframe was designed for a BMW /7 and there are some slight differences. Three existing holes needed to be enlarged from 8mm to 3/8". The top hole was right next to the upper shock mounting bolt. The eyebolt is for the upper rear support.

The lower mounting bolt was one of the main supports for the rear subframe. You can really see the difference in tubing size between the bike frame and the DMC subframe. The Cozy supplied mount used the upper shock mount for the rear support. You can see the lower mount for the sidecar on the curved tubing running underneath the muffler and swingarm to attach on the opposite side of the bike. All of the bolts are grade 8 and very sturdy. On this side, the only change was a single washer was needed between the subframe and the bike.


This is the single mounting point on the left side of the bike. This hole was also unused and just needed to be enlarged to 3/8". The gap between the subframe and the bike on this side is about 5mm so I need to pick up some flat washers tomorrow before I can tighten everything down. I am really impressed at the quality of the DMC subframe. I need to remove the lower fairing before I can mount the front subframe. I suspect that I'll need to remove the Brown sidestand that I installed a couple of years ago since it also mounts to the rear engine bolt (all-thread running the width of the engine.

I haven't heard back from DMC yet but I'm hoping that he isn't having second thoughts about modifying the front mount and supplying the additional parts and pieces.

Friday, November 9, 2012

Cozy Project

Now the fun begins. It had warmed up considerably this morning (as in +16°F) and the gentleman with the Cozy sidecar attached to his R100/7 sent a text that he was separating them this morning. At noon, I went by his home and picked it up along with the DMC subframe and other hardware. Once I sort through the pieces, I will probably try and mount the subframe and contact DMC for the additional parts and pieces to connect them together. I will also need to add some additional lighting. The little orange light at the top of the fender currently serves as the front and rear turn signal and there is a small tail light on the back of the fender. Isn't this a great winter project?

Tuesday, November 6, 2012

Get Out and Vote

Winter temperatures have actually arrived in interior Alaska. Not much snow yet but enough to ski on (barely). This morning at 7:00, the line at my polling place was practically out the door. I was pleasantly surprised to see that the entire line of cars in front of me from the Steese Highway all turned into the shopping mall where the polls for two districts were set up. There were political sign wavers on the highway and they seemed to choose the worst place to stand like in the middle of curves or on the center islands of the highway. I don't know what they are thinking. But I applaud them for being dedicated enough to their candidate to be outside at these temperatures.