Wednesday, August 29, 2018

Getting Ready Again...

Starting to get ready to head out again. One of the challenges was to find a way to carry the RV storage cover. As you may guess, it's huge. Originally, it was shipped in a moderately sized box in a vacuum bag. There was no way I am going to get it into a similarly sized box. Last spring, I kept looking for a plastic storage bin but there wasn't anything large enough that would still fit between the toolbox and the fifth wheel hitch and under the tonneau cover. So the cover didn't go down on the last trip and the fifth wheel RV isn't undercover right now while in storage.

While shopping for a hitch mounted cargo carrier (I ordered the Reese Explore ProSeries Rambler), I found that waterproof cargo bags were available to fit these carriers. The bag I ordered was 5' long, 21" wide and 20" to 24" high. The height of the toolbox is 20" so it looked ideal. The RV cover fits easily inside with room to spare without using the 4" expansion. The material seems to be heavy and where it touches the base of the fifth wheel hitch, I used foam pipe insulation to protect the bag from possible abrasion. The hitch carrier is rated for 500lbs and the plan is to put it on the back of the trailer. I could carry the RV cover back there or possibly the pedal assist bicycle.

The plan is to hit the road around the middle of next month. The pile of stuff in the garage is starting to grow. I had unpacked everything and have been using things such as tools throughout the summer. Identifying what I want to take down with us is going to be a challenge.

Saturday, August 25, 2018

Reality TV?

The word on the street is that this is a film crew from the A&E reality TV show Hoarders. In this case, "the street" was a construction worker standing in the middle of the street holding the stop sign near this location. Just about anyone who's been to Fairbanks (Dom) may remember this place on Farmer's Loop Rd near the golf course. I've never seen the show but there are a lot of locations that are even more cluttered than this place.

No adventures this week just a lot of running around with the Ural. Many times in the rain. I'm also gathering parts and pieces to make a Raspberry Pi based DMR (Digital Mobile Radio) hotspot. More on this in a later post...

Sunday, August 19, 2018

World Travelers

After getting back to Fairbanks, I checked the DeLorme page for CCJon and saw that he was in the Walmart parking lot. We had been texting back and forth since he had some sidecar and tug issues while on the road. I went to the parking lot and he and Nestor, his nephew, were easy to spot even among all of the RVs that fill the lot during the summer. Here, they are spraying chain lube on Nestor's chain after he arrived back from Deadhorse. Coldfoot to Deadhorse and back to Fairbanks in one day. Amazing. He has now completed the entire Pan American Highway.

I led them back to our house through all of the road construction that seems to be plaguing Fairbanks these days. He let me drive his extremely wide sidecar rig. The plastic marker is nice to have as it is easily a foot wider than the Ural and you can't see the fender while riding. Even with the weight and size of the sidecar, the rig is very easy to drive. At least for the short distance of the test drive. Tons of power even at low rpm and lower gearing. The bike is what felt huge to me.

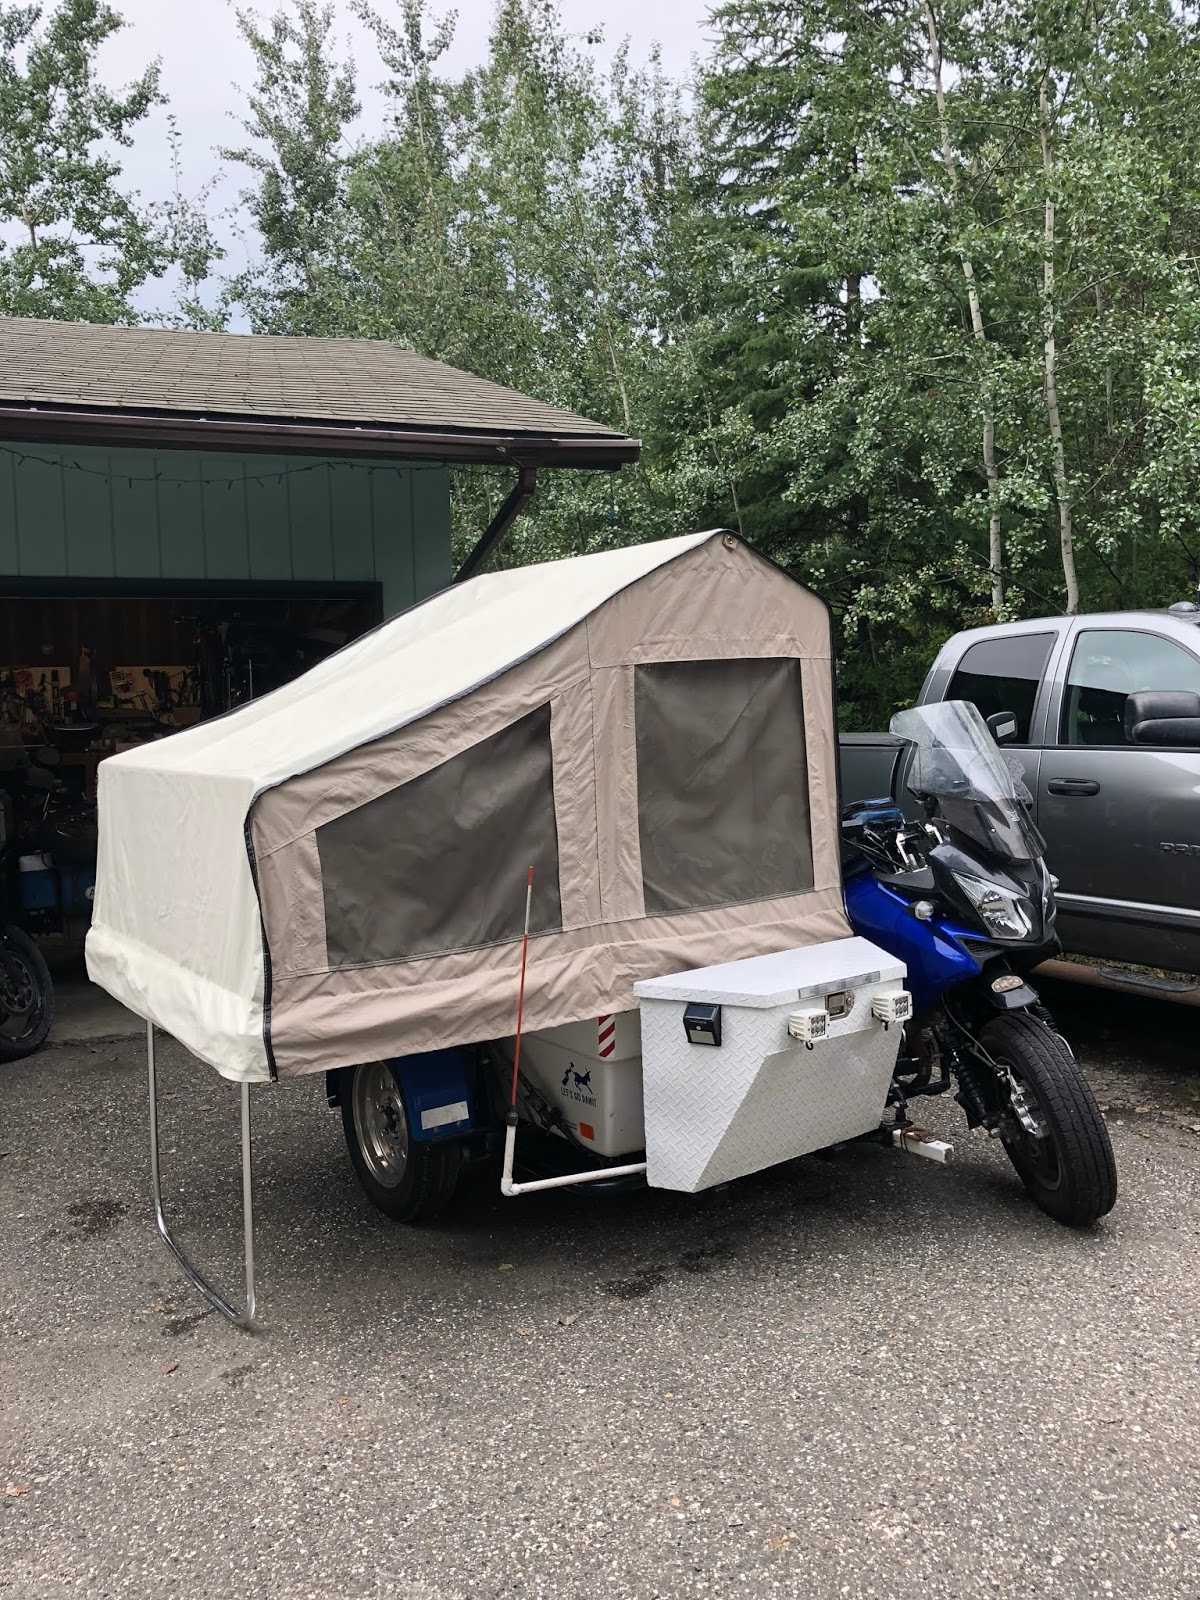
After dinner, CCJon decided to set up and stay in the tent trailer since all of his gear is packed inside anyway. I had been really interested in his rig ever since I saw what he was putting together. It was built by Claude Stanley at Freedom Sidecars in Middleburg, PA. The tug is a 1000cc V-Strom with only slightly lower gearing than stock, leading link front suspension, and car tires. The support leg of the tent trailer platform doubles as the rack. The tent supports are then raised and his moto-RV is ready for occupancy.

Anyone who has tent camped while on motorcycle trips will really appreciate the attraction of this rig. Lots of dry storage and not sleeping on the ground. During the setup, I noticed that the anti-sway bar arm was touching the sidecar frame. And the suspension piece that determined the ride height of the sidecar frame was set to its lower limit. I.e. there was no upward suspension travel at all on the sidecar. We made a small adjustment the next morning and he will see if it upsets the handling. I expect that the pull to the right will be reduced and the sidecar to tug attachment will need to be raised as well. That would eliminate the slight lean in i.e. the bike looked like it was leaning towards the tent trailer. But, then again, I have no experience with rigs running car tires.

This is Nestor's V-Strom that made the Pan-American Highway trip. Still really clean and from what I heard, it has been a very reliable bike. Some of the gear was removed when this picture was taken. It was not seriously overloaded like many of the riders that I see passing through Fairbanks. The only preparation needed for getting on the road again was adding air to the tires after the trip on the Dalton Highway.

Here they are both packed up and getting ready to head south again without much of a break. CCJon's rig had developed a crack on one of the sidecar cross members which he had welded and reinforced. The welding shop recommended by DavidR did a great job. It looks stronger than it did originally. CCJon also plans to rebuild the clutch slave cylinder. It sounds like there may be some seepage in the slave cylinder when the lever is held in as he needs to regularly add hydraulic fluid. From here, they are headed to Haines to catch the Alaska State Ferry to Washington before heading back to Texas. The ferry trip should be a good time to relax as I think it's a five-day trip.

It was great to see CCJon again. I missed him the last time he passed through Fairbanks but caught up with him a few weeks later at the BMWMOA rally in Salem, OR. He mentioned that the next Sidecarist rally is in Couer d'Alene, Idaho, next July. I may have to add that to the calendar. CCJon is involved in the organization of the next rally and plans to check out the venue on the way.

Saturday - I just received a text from CCJon. They are in the very crowded town of Haines. Hopefully, they both get onto the ferry on Monday.

Friday, August 17, 2018

Last Trip to Utqiaġvik?

Off again on another trip north. I was thinking that this may be the last trip to Utqiaġvik as the contract is ending soon. The plan has always been to transition IT support to UIC Science, the local company providing logistic support to the science community doing work up here, but it sounds like they aren't going to be ready by the end of September. The forecast for the north slope was for temperatures in the low 30s (°F) and a possibility of snow. No snow though I did talk to a rider at the Prudhoe Bay hotel and he said that it was snow, sleet or rain all the way from Atigun Pass. He didn't look very excited about having to ride through that again on his way back south.

At least I had decent leg room on the flight to Prudhoe. This was one of the older 737 models that only have one over-wing emergency exit on each side. But it's not like the flight is very long. The wait in Deadhorse was almost four hours but at least they have decent, free Internet that usually works. But not on Monday, the day I was traveling north. I'm not sure what is going on in Utqiaġvik but the plane was packed. Maybe it's all of the school teachers arriving back after their summer break.

They have this on display at the BARC. The original marker from the crash site of Wiley Post and Will Rogers in 1935. It was recovered sometime in the last couple of years by an archeological group working in the area. The ocean is gradually claiming more of the coastline including the crash site.

It’s not really obvious in this picture but the wind is almost strong enough to lean into. The NWS also has a high surf advisory with water possibly washing over the road. Heavy rain and even thunder this morning. Another pleasant day up north. The whalebone arch is probably the most photographed thing up here. But now it is located off the beaten path as the road is always under repair. It washes out almost everytime there is a storm.

Another shot showing all of the ice being blown into the shore from the west winds. Or at least I think that's the term for when the wind is coming from the west. Yesterday, you could see an occasional bit of sea ice. Nothing like this. Earlier in the afternoon, the waves were almost coming up to the top of the beach.

Actually, by the time this post is up, I will be back in Fairbanks.

Tuesday, August 14, 2018

Screaming Banshee Install

I haven't had the Ural horn installed for the several years. The PowerArc ignition system that I had installed back in September 2015, has its coil mounted in the spot where the horn normally sits. Since then, I haven't had the stock horn installed. Removing the Ural hydraulic steering stabilizer and its brackets once again made room the horn.

In 2014, I had purchased an air horn and electronic module on Kickstarter called the Screaming Banshee. The air horn is the one commonly sold in many stores but the electronic module is what made it different. If you just tap the horn button, the stock horn sounds. If you hold the horn button down for more than ¼ second, the air horn comes on as well. There are jumpers to change the delay between ¼ and ½ second and select between a continuous blast or a pulse. The module also has a wire that can be connected to flash your high beam when the air horn goes off. I tried it out on the BMW but couldn’t find a good place to install the air horn. The Ural made the installation challenging since the horn button switches the ground connection (like just about every other vehicle with a horn relay). The Screaming Banshee module assumes that positive 12 VDC is supplied to the horn (like most vehicles but unlike the Ural). I added a horn relay and rewired the stock horn accordingly.  Power for both horns now comes off one of the unused terminals (#5) of the PDM60. It's set with a 15-second power on delay. The power for the relay still goes through the stock wiring so still goes through the  BRS (kill switch).

Adding the horn relay and 2" square control module is about all that can be squeezed into the headlight housing. It's really packed. After testing the system out, honestly, the air horn isn't that much louder than the stock horn. But today was the first time I've actually tried it and it has been attached to the sidecar frame for the last 30,000 km. Maybe it's worn out just from the vibration, dirt, water, snow, etc. It looks a lot different than the first picture of the item when new. I've installed similar air horns on other cars before and I remember them being a lot louder. 

Saturday, August 11, 2018

GB-500 E-Bike Review

The pedal-assist folding fat-tire bike sold by Greenbike USA that I ordered while in Oregon now has around 150 miles on it. It may be time for a more extensive review. First of all, I really like the fat tires. They are 4" wide on 20" rims and run between 5-30psi. The lower pressure for really soft sand or snow and the higher pressure for pavement. The main road near our house is undergoing a lot of construction so there are a lot of unpaved patches. The bicycle feels really solid in these unpaved sections even if the motor breaks traction on the loose sand and gravel. On the left handgrip next to the LCD display, the red switch is for the headlight/taillight, right below that is the turn signal switch, and below that, the green button is for a pretty loud horn. The "+" and "-" buttons on the display are to change the pedal assist.

There are 9 levels of pedal assist but honestly, I regularly only use 1, 4, 7, 8 and 9. I do need to change the pedal assist level depending on where I’m riding or you could be launched faster than would be safe. For example, too much pedal assist on loose sand or pea gravel will break the rear wheel loose. Fun only if you are expecting it.

I found that I rarely use the thumb throttle when pulling away from a stop. 5th gear with a cadence of around 90-100 rpm gets me right around 20 mph. Maintaining that cadence seems to be pretty natural for me probably due to years of bicycling in the now distant past. Obviously, you slow down on hills. On our subdivision hill, I drop down to 2nd gear and the same cadence will get you around 11 mph. I've never been able to actually ride all of the way up our hill even when I was cycling on a regular basis. This would be back in the early 80s.

I'm still not really sure of the actual battery range under normal use. Last week, I rode to the shop where the truck was getting repaired. Including a detour to the bank, it was about 9 miles and the battery gauge didn't budge off of full. I pedaled all of the way including through some road construction sections where I was easily able to keep up with traffic. One of these days I’m going to test the range. The key on the battery turns the battery on/off and also locks the battery in place and it needs to be in place while riding. Only an issue if you have a lot of keys dangling against the paint.

The seating position is okay though the handlebars seem too high. I'm used to touring bikes where your weight is evenly distributed between the pedals, handlebars, and seat. The bars are at a comfortable height when standing on the pedals. Maybe that’s the intent. The front suspension gets a pretty good workout when riding through the road construction. I can’t really tell if there is much movement of the rear suspension.


The plastic fenders do a good job of containing the road spray. I ended up riding through rain showers last week and you could see water pouring off of the front fender. A mirror on the left side would be a great addition especially when riding in traffic and at intersections. I do ride on the shoulder if there is a lot of pedestrian traffic on the bike path. These days, there are quite a number of joggers, walkers, roller skiers, and slower bicycles on the Farmers Loop bike path. Fortunately, there is now a substantial shoulder due to the recent construction. Unfortunately, there are too many bicycles riding on the wrong side of the road.

Locking the bike when stopped is proving to be the biggest challenge. I picked up a large “U” lock and cable in Washington. The lock fits around the seat stays and through the rear tire. But not around anything else like a bike rack. Which just leaves the more easily cut cable for that task. If I want to lock the front wheel, I need to use another cable lock. Plus, there is a quick release on the seat post and handlebars. Maybe I just need to replace the quick releases with Allen or torx head bolts. Or maybe I’m just paranoid. In this picture, you can see the tail/brake light and the turn signals. The rack is incredibly sturdy and has smaller gauge aluminum where the panniers actually attach. 

Friday, August 10, 2018

Tanana Valley State Fair

The “senior” admission to the fair was only $5 which seemed reasonable to me. All of the fairs in Alaska call themselves “State Fairs” but they are more equivalent to local or county fairs. I had heard that there wasn’t much there and they were right. Maybe half the normal number of vendors, a smaller midway, and many long-time vendors were absent. Last year, a friend from Anchorage with a booth had mentioned that the rental rates were increasing and the number of days open was reduced. He was thinking that it wasn’t worth coming up anymore. He wasn’t there. 

Some of my favorite food stands like the grilled corn and the halibut/corn fritters booths were there. But no lines or crowds anywhere. One of the pavilions had entertainment with maybe 2-3 people in the audience. That must be discouraging to the acts performing. 


Wednesday, August 8, 2018

New Clutch

Last June when going through Canada pulling the 5th wheel, there was a couple of sharp jerks while accelerating up a steep hill (10% grade). This meant the clutch was slipping. I known for a while that there was a potential problem with the dual mass flywheel that Dodge started to use on the 2005 models but only under heavy load. The purpose of the dual-mass flywheel was to reduce transmission noise at low engine RPMs. After that happened, I tried to not push things too hard by backing off if I saw the turbo boost gauge approach 30 psi and downshifting more. There was only the one occurrence on this last trip and it happened once on last summers trip when climbing steep grades in Colorado. The consensus on the Internet forums was that once the clutch starts slipping, it just gets worse. At 19,800 lbs combined weight, we are far from the trucks rated 26,000 lbs so I wasn’t expecting this problem.

I took the truck into the Diesel Doctor, a shop here in Fairbanks that pretty much only works on diesel trucks. I asked about aftermarket clutches and they were amazed that my truck was 13 years old and I was just now getting around to replacing the clutch. I guess that most people who actually used the truck for heavy towing were getting it replaced within the first year. The stock clutch really didn't cut it. They recommended a South Bend single disc ceramic clutch. The truck now has a new flywheel (no more dual-mass flywheel), an organic/ceramic clutch disc, stiffer pressure plate and another hydraulic clutch assembly to handle the stiffer pressure plate. This setup is rated for 475 hp and 1000 ft-lbs of torque and I'm under that. The other option was a twin-disc setup rated for 650 hp and 1300 ft-lbs of torque. The shop didn't recommend that one as it's designed for much more severe use. Such as tractor pulling...

I rode the e-bike down to the shop and picked the truck up last Friday. There was a lot of evidence on the flywheel and pressure plate that the clutch was slipping. And quite a bit of rotational play had developed in the dual-mass flywheel. The clutch pedal is now about 50% heavier and you get a bit more transmission noise at low engine RPMs but nothing annoying. Engagement is smooth. Maybe it'll be different when towing. We'll find out next month. They also noticed that the rear main engine seal had a slight leak. It was easy to change since the transmission and flywheel were already removed. I also had them check for a worn water pump or idler pulley since I could hear a worn bearing noise on our drive north in June. They found a worn bearing on the idler pulley that provides tension to the serpentine belt. The belt was also replaced as it's on the 75k mile service list.

They mentioned a few other things to keep an eye on like the front ball joints and front axle u-joints.

Saturday, August 4, 2018

Yet Another Steering Damper

Thank you to Dom at Redlegs Rides for having a link to the VW Beetle steering damper that can be made to work on the Ural. The rig originally came with a friction damper. The damping force was linear and, in my opinion, it was better than nothing but just barely. I installed the new style (2014) hydraulic damper that Ural sold in their store to retrofit onto the older models. Much better as the damping force was proportional to the turning rate. It was worn out when the rig was getting worked on by Raceway a year later so they replaced it under warranty. It had worn out again as there is almost no damping.

I was able to reuse the bracket from the Ural hydraulic damper at the sidecar strut clamp and just needed to fabricate an upper mount. The right-hand thread Heim joint is a tie-rod end from some car and I found it on Amazon. The aluminum angle is left over from my top box installation. From all reports, this should be a huge improvement over the Ural steering dampers. And the VW part was only $29 on Amazon (with free shipping!). A fraction of the price of the Ural part.

A test ride showed that there is increased resistance to turning the bars and I couldn't get the steering to wobble at all no matter how hard I tried. Low-speed steering wobble is something that many sidecar rigs deal with. This steering damper is fantastic. I will probably fabricate an upper mount out of steel as I believe the aluminum may fatigue and fail unless I weld in some gussets. The forces are not that great so maybe it'll be fine...

Thursday, August 2, 2018

RV History

So far, we’ve towed the 5th wheel trailer 12,722 miles. This is my first experience towing a 5th wheel trailer and the most notable thing is how stable it is. You can barely feel crosswinds but headwinds are very noticeable. After all, it has the aerodynamic profile of a brick. The 2005 RAM 3500 seems to pull it fine though the added weight of the trailer has introduced some unexpected repairs. More on that in a future post. We've made lots of mods and changes since it was purchased and is fairly roomy and comfortable especially when compared to other RVs we've had.

But for background, here is a summary of my RV history. The next three images are from the Internet as this was all in the film days. You didn't take a picture unless there was a good reason. And there was rarely a good reason to take a picture of your vehicle. At least until blogging...

The first RV owned was a 1978 Chinook built on a Toyota chassis. Single rear wheels were cheaper at toll booths. Not too bad. It was sort of self-contained with a kitchen, bathroom (no shower) and you could walk through from the cab. The icebox needed blocks of ice and it could not pass up a gas station due to the minuscule gas tank and mediocre gas mileage. It made several round trips to the lower 48 and was very convenient for traveling especially compared the minivan we used for the prior trip.

The next RV was a Grasshopper travel trailer that I bought from my parents after they decided that they weren't going to be camping anymore. This was more self-contained as it had the predecessor of a cassette toilet, a 3-way refrigerator and fresh and grey tank. It had a rear door so the setup was more camper-like but it made it easy to carry bicycles. Only used for one trip north. Less convenient than the Chinook but much more livable space. The lack of tandem axles meant that it took a real beating when towed up the highway behind a 1-ton crew cab. Lots of things needed to be screwed back together after getting it up to Alaska. It was sold to a local dog trainer as she really liked the convenience of the rear entry.

The next "RV" I couldn't find a picture of. It was an older 11' cabover camper. This is 3' longer than the bed of the truck and didn't include the queen size bed over the cab. It weighed a ton and was carried on our '91 Ford F350 crew cab which carried it fine until you tried to go up a mountain. The truck was a naturally aspirated (no turbo) 7.3-liter diesel. On its first trip down the Alaska Highway, a frost heave caused the wood for two of the camper tie-downs to fail. In Watson Lake, I drilled through the floor of the camper and the bed of the truck and just bolted the camper to the truck. That worked really well.  So well that even after rebuilding the camper frame, I still used the bolts through the floor. With this old camper, we were back to an ice-box, a porta-potty, and a freshwater tank. It did have a propane furnace, which was a first for us, but only used it once. It made a couple of round trips and was used for several trips within the state. To me, the main problem with a camper is the hazards associated with putting it on and off of the pickup. Especially something tall like that F350.

The next RV was a Wilderness travel trailer. I was looking for something towable by a 1/2 ton Suburban and this sort of qualified. The Suburban didn't do a very good job as a tow vehicle contrary to what GM advertising may claim. This trailer was also our first foray into fully self-contained. 3-way refrigerator, furnace, A/C, water heater and a full bathroom including a tiny tub. With this trailer, I learned how fast a furnace runs through propane and that a single deep cycle battery won't run the furnace through the night. But we used it for two round trips to the lower-48. And for a couple of summers, we used it in our driveway during fire season as it had air conditioning. It was sold to be replaced at some future date by a fifth wheel trailer.